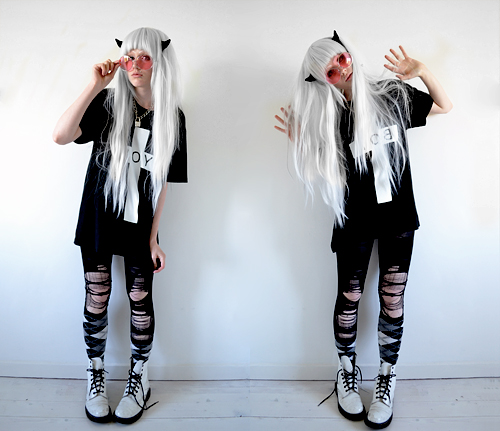
Thursday, August 23, 2012

TUTORIAL ☆ White hair, step by step

I was planning to finish this and post it yesterday, but things got in the way (things like lying on my floor screaming at my stomach to stop torturing me. I ate something bad). So I'm posting it now instead! It's time for...

Iro's white hair tutorial


★ INTRO ★

Each part of this tutorial will consist of a longer more detailed text, then I will make a shorter summary at the end. So you can choose how much you want to know ~

I've had white hair on and off since I was around thirteen. Apart from white I've also had every other color and hairstyle possible, but I've always gone back to white, grey or silver. It's been hell for my hair but I least I know my stuff when it comes to going through that hell and come out of it with a lovely color. Time for me to share this knowledge with you!

★ STEP ONE ★
Bleaching.

The key to any shade of silver, white or grey is proper bleaching. But you can not just bleach your hair five times in the same day and expect it to be done. This will severely harm your hair, and the color result won't even be that good.

The science behind it goes like this; when you bleach your hair every straw ”opens up” and lets go of the amount of color it can until the straw is closed again. This is what's harming the hair, but that's not the point I'm trying to make. The thing is, it takes around 1-2 weeks for the straws to close again.

So how do you bleach your hair to get the best result?
Simple, wait 1-2 weeks between every bleach.

(This comes with a silver conditioner. Do not use this if you want white, not silver/greyish hair)

Apply the bleach, then wrap your head in aluminum foil for best result, follow the instructions on the package.

I suggest you bleach your hair at least twice, even if your hair is very bright. The white dye will stick better if the hair is newly bleached. If your hair is darker, you need to keep bleaching every two weeks until your hair sort of looks like on the picture below.


Apply a good hair remedy after every bleach. There are recepies online if you don't want to buy one. Use a good conditioner with keratine in. Avoid all hairproducts with silicone, as silicone also has a bad effect on the color result.

★ STEP TWO ★
The last bleach.

When you only need to bleach your hair one more time to be done with the bleaching step, it's time to purchase some good toner. The Silver Blonde Platinum bleach comes with a conditioner with purple pigment in that will (eventually) give you silver hair. So you can use this if you want to, but if you want white hair, I suggest you stay away from this.

The white toner I use is Directions White toner.

Bleach your hair the last time, wash your hair with shampoo, not conditioner, and blow dry your hair. Directly apply the dye. Here, don't care what the instructions tell you, leave the hair dye in for as long as you possibly can. I usually set a whole day aside just to dye my hair.

When you wash it, don't panic. Your hair will be purple.

★ STEP THREE ★
Purple pain.

Now, when your hair is purple, you have two choices (depending on how damaged your hair is and how much more it can take before falling off):

Wait for the purple to fade, which it will after a few showers, or bleach your hair one last time.
Mine was way too damaged to be bleached again, so this is how I looked for weeks. Like a sunburned, purple mushroom. With temporarily terrible skin. But I powered through, dammit.


★ STEP FOUR ★
 Voilà.

Once you've bleached or tortured yourself through step three,
your hair will hopefully be white as snow! I've been living with purple hair for weeks, and this is my end result;


If I were to say something to sum this up, it would be that white/silver hair takes patience. A lot of patience. It's hard on the hair so you have to take it slow. But it's a kind of awesome haircolor, so it's worth all those weeks right?

★ STEP FIVE ★
Making it last.

Simple! Mix in some white toner with your conditioner each time you wash your hair and leave it in for a few minutes. This makes it last a lot longer. After a few weeks you'll have to re-dye it though (and possibly bleach it again).

★ SUMMARY ★

Bleach: Wrap your hair in tinfoil while bleaching. Wait 1-2 weeks between each bleach, keep bleaching until your hair is as bright blonde as it can be (see picture). I use Schwarzkopf's L101 silver blonde platinum bleach. Do not use the silver conditioner that comes with it if you don't want greyish hair.

Dye: Right after the last bleach, wash your hair. Do not use conditioner. Blowdry, apply hairdye. I use Directions white toner. Leave in for as long as you can, the longer the better.

Kill the purple: Either wait for the purple to fade, or bleach another time. Depends on how your poor hair is feeling.

Done: yes, you're at the end of your journey!

After work: Mix your conditioner with some white toner every time you wash your hair to make it last longer.

★ THE END ★

That's it! Now, I have to say this is what I do. I can't guarantee it will work for anyone, of course. But a few tips, tricks and guidelines are better than none, correct?

I'm going to make a video about hair too, when I figure out how to use the webcam on my new MacBook ( ´∙ ω ∙) 'til then, have a good weekend! Hugs and kisses ♥

Monday, August 20, 2012

Upcoming stuff

Evening ♪

I just thought I'd make a quick post about some things I've been working on for a while, and will soon post. It's also a few things that have been on my mind and have been writing down, so I'll probably post that too since I think it's something that may be helpful to other people, or just good for me to share. Anyways!

1. White hair tutorial
- A surprising amount of lovely people have been asking me for white hair advice lately, so I'm making a step-by-step guide. I'm thinking about making a video...?

2. Online shopping
- There's a reason I'm broke at the moment and that may be bad, but at least I know where and how to online shop, dammit. Also I've been asked to make a post about this!

3. Self-consciousness/my past
- This is what has been on my mind. I've written quite a lot about it. I don't know if anyone would want to read it, but this is my blog, so why shouldn't I post something that is really close to my heart?

4. New designs
- I have a lot of sketches!

5. Inspirations, random thoughts, probably my awesome new school...

To sum up, things I'm too tired to write about right now haha~ Today I had my first day at my new school and I'm completely exhausted. A bit low too to be honest. But that's how I usually feel when I relax after a nervous day. My school really seems good though. So I'm happy about that, finally.

This is how I looked to day anyway~♪ Have other pictures but I'm too lazy to move them from my phone today, haha.


So that's it for this time! Goodnight my sweets, hope your tomorrow will be a great one ♥

Saturday, July 21, 2012

My fashion progress... From tomboy to black and white girly girl ♪

Evening bloggy ♪

It's quite interesting to see how my outfits, makeup - my style in general - has changed since I first started getting into street fashion. I noticed when I was cleaning my folders, so... here's a big picture post ᕦ(o⌣o*)ᕤ


First of all... I don't even know what to write because it's kind of weird looking back at this time, haha. I stopped dressing in visual kei clothes, and this is what happened. The Bieber tomboy (just happened to be at the same time as I came out of the closet. Coincidence? Hm).

These are only face shots, but I was still very self-conscious about my body and didn't feel comfortable in this style, to be honest (シ_ _)シ 

Just thought I'd show these as some sort of "before" shots. On to the change I was talking about! 


Last autumn: First pics of myself I posted on tumblr (*ノ・ω・) 
Started wearing more japanese brands again; like HELLCATPUNKS, Algonquins and SUPER LOVERS.


Winter/spring: This is around the time I started to slooooowly embrace my more girly side. The pigtails is what started it. Seriously. I was still very into visual and oshare kei (which I still am but don't wear as frequently) and these are some of my fav outfits even now ♪ 


Spring: still boyish, but with the wigs came the false lashes, lenses and girlier makeup...


Still spring: Getting close to where I am now! Tumblr was affecting my fashion more and more. I LOVE this pastel goth style that's trending now, and I started taking inspiration from my dashboard. 

Skeleton tights, round sunglasses, star eyebrows, creepers... (。・ω・。) 


Spring/early summer: This is when I found "my" style, I think. The pic at the top is what did it. More and more black and white outfits, more and more trending tumblr inspiration. And nowadays...


Now: Black and white invasion. 

I almost exclusively base my oitfits on black and white clothes now. I was afraid to at first, because I thought "black and white is kind of boring, isn't it? No variety". But I think I look different from day to day, even though it's mostly black and white, so I proved myself wrong there. I must say I love dressing like this (゜u ゜) 

Black and white and something pastel-ish to stand out from the rest is what I go for~!

The devil horns, these glasses and my spikey headband has become my favorite accessories. All things I could never imagine wearing just six months ago! It's fun seeing how quickly my style has developed to what I'm wearing today. 

Hmm I wonder what I'll look like six months from now? 

Well that's it for this long post, goodnight, sleep tight and dream sweet dreams! Or just shut up and go sleep like a log (。・ω・。)ノ♡ 


Saturday, July 14, 2012

FEEDBACK

Here is the feedback page for irosgarden.storenvy.com, i e my webshop!

This was asked for by my very first customer, and since I've had the ambition to make a feedback page (but haven't gotten to it) now I'm making this one. 

Thank you for being my customer, I really hope you're pleased with your purchase (ღ˘⌣˘ღ) ♫・*:.。. .。.:*・
I want to make people happy any way I can, so I put a lot of love into my work, and hope that it can be a way to bring people happiness. 


That's all I have to say! 

Feel free to say what you think about the product you bought~!

Monday, July 9, 2012

Storenvy opened ♪

www.irosgarden.storenvy.com

So I'm selling some headbands here.

I don't know why I'm so nervous all of a sudden. I guess because so many people asked, I felt really excited and happy while making the headbands I'm selling... And now when I've been going on and on about this for so long, I'm afraid to be dissappointing on pretty much all levels, prices, look, colours. Just thinking too much haha ( *`; ω ;´) let's hope I'm not dissappointing anyone.

Anyway. Spikey headbands will be 39 USD. Which is basically material costs since I think any more than 39 USD would be too much.

Now I'm going to drink lots of tea and calm down. Wishing everyone a good night and coming day. Peace out♥

(notice now that my skin looks really dark on this pic too. Bad light is bad in my kitchen, haha)

Sunday, July 8, 2012

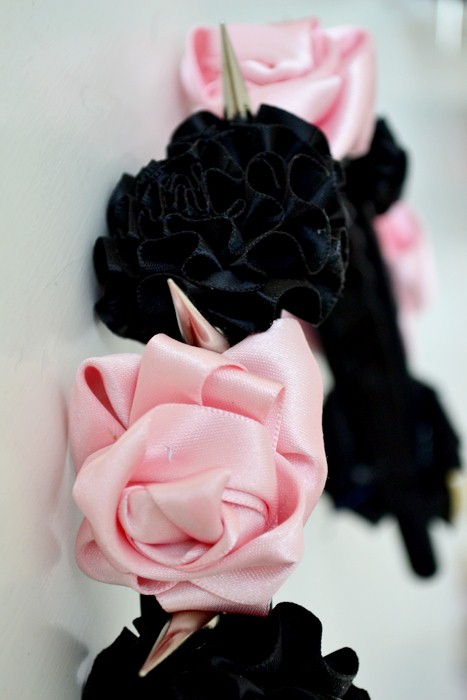
A preview/info post about my spikey friends!

Finally finished the last details today ♪

Now, since this is my first trial-collection of headbands, I only made 7. But! Since the response I've gotten has been so positive, I've ordered more material and will be able to sell more in the near future. 


Next batch will be bigger, I promise. 

Here are the styles I have for now (ノ´ー`)ノ


White Mix x Black
Two styles of white roses, two styles of black roses~
Made two of these.


Matte White x Black
Basically the same as the Mix White, except that all the white roses are identical.
Made two of these.


Peach pink x Black
I really like this one ヽ(;▽;)ノ Personally, I think it would look great with brown hair!
Made two of these.


Glossy Pink x Black 
Only difference from Peach Pink is the roses, again. 
Made one of these!

All roses are handsewn and as for the rest of the crafting, a magician never reveals her secret~! 

The marketplace I've used is storenvy. I tried making a purchase, and it was crazy easy. You just register your address and all that, then pay through paypal and I will send a parcel your way the minute I see the order. 

Will post a link to the store on pretty much all sites I'm on and update this post as soon as I've launched the shop. This is just a preview thingy I made since I wanted to show what I've made~

Now I'll work on devil horns until more material has arrived. 

Would also like to say thank you to all of those who has messaged me and cheered me on while working on this project 
(`; ω ;´) I really can't thank you enough, it means so much to me. I've always wanted to do a bigger project and share it like this, but I've never really had the guts, haha. Thank you for encouraging me! ♥ 

Soooo much love ♥ xoxo 

Saturday, July 7, 2012

Goodnight picture~ or something like that.

Blogspot has changed a lot since I last used it (。ノω\。)゚ I'm having trouble finding blogs to follow, haha. Feel internet-handicapped or something.

Give it time, give it time...
And once again I'm blogging before bed. Since I can't figure out how to post gifs either, here's a non-moving goodnight-wave! (`•ω•´)